ML Kit 얼굴 감지 비전 모델을 응용한 토이 앱 Let's Smile 만들기
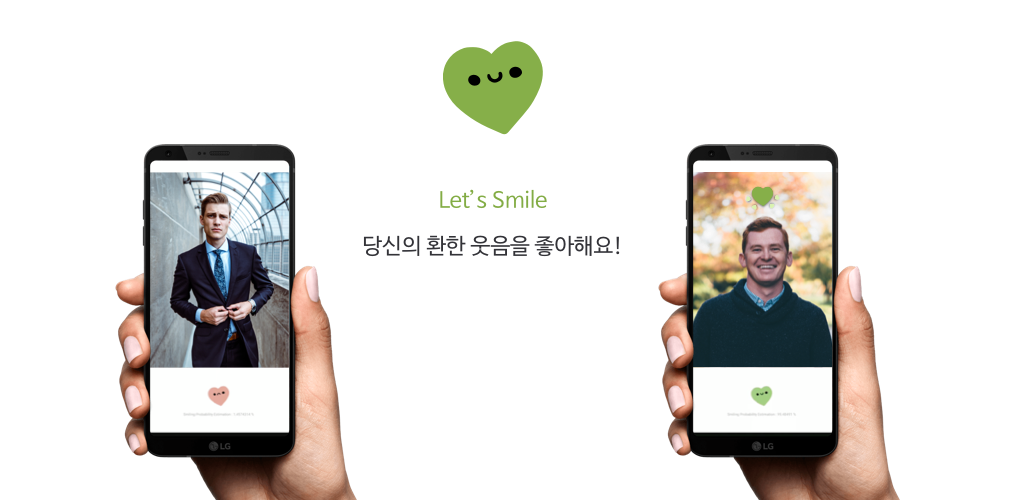
Let’s Smile 은 카메라 프리뷰 위에 사용자 얼굴을 인식하여 사용자의 얼굴 위치와 Smiling Probability (웃고 있을 확률)을 감지합니다. 웃음을 감지하면 머리 위에 귀여운 Lottie 애니메이션을 송출합니다.
Google Play Store 다운로드
상태 분류
FirebaseVisionFace.smilingProbability가 70%가 넘지 않을 경우
== 무표정인 경우
FirebaseVisionFace.smilingProbability가 70%가 넘을 경우
== 웃는 표정인 경우
구현 사항
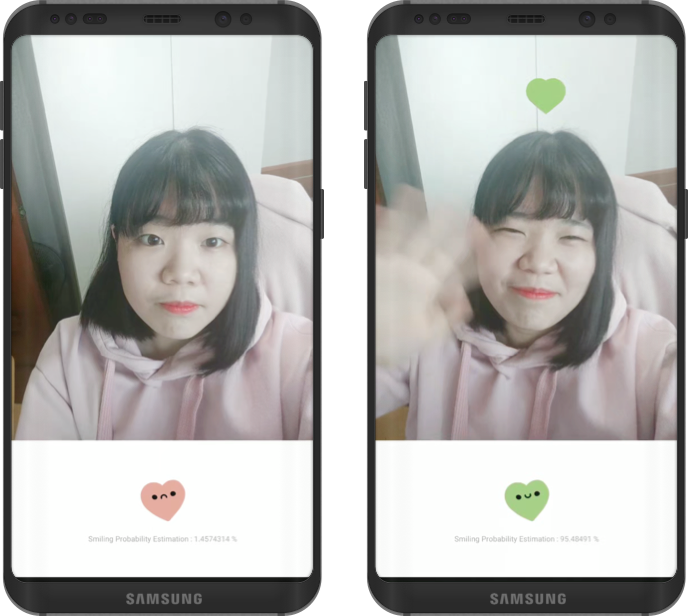
무표정인 경우
- 슬픈 표정의 ImageView 노출
FirebaseVisionFace.smilingProbability TextView 표시
웃는 표정인 경우
- 기쁜 표정의 ImageView 노출
- 머리 위로 귀여운 Lottie 애니메이션 송출
FirebaseVisionFace.smilingProbability TextView 표시
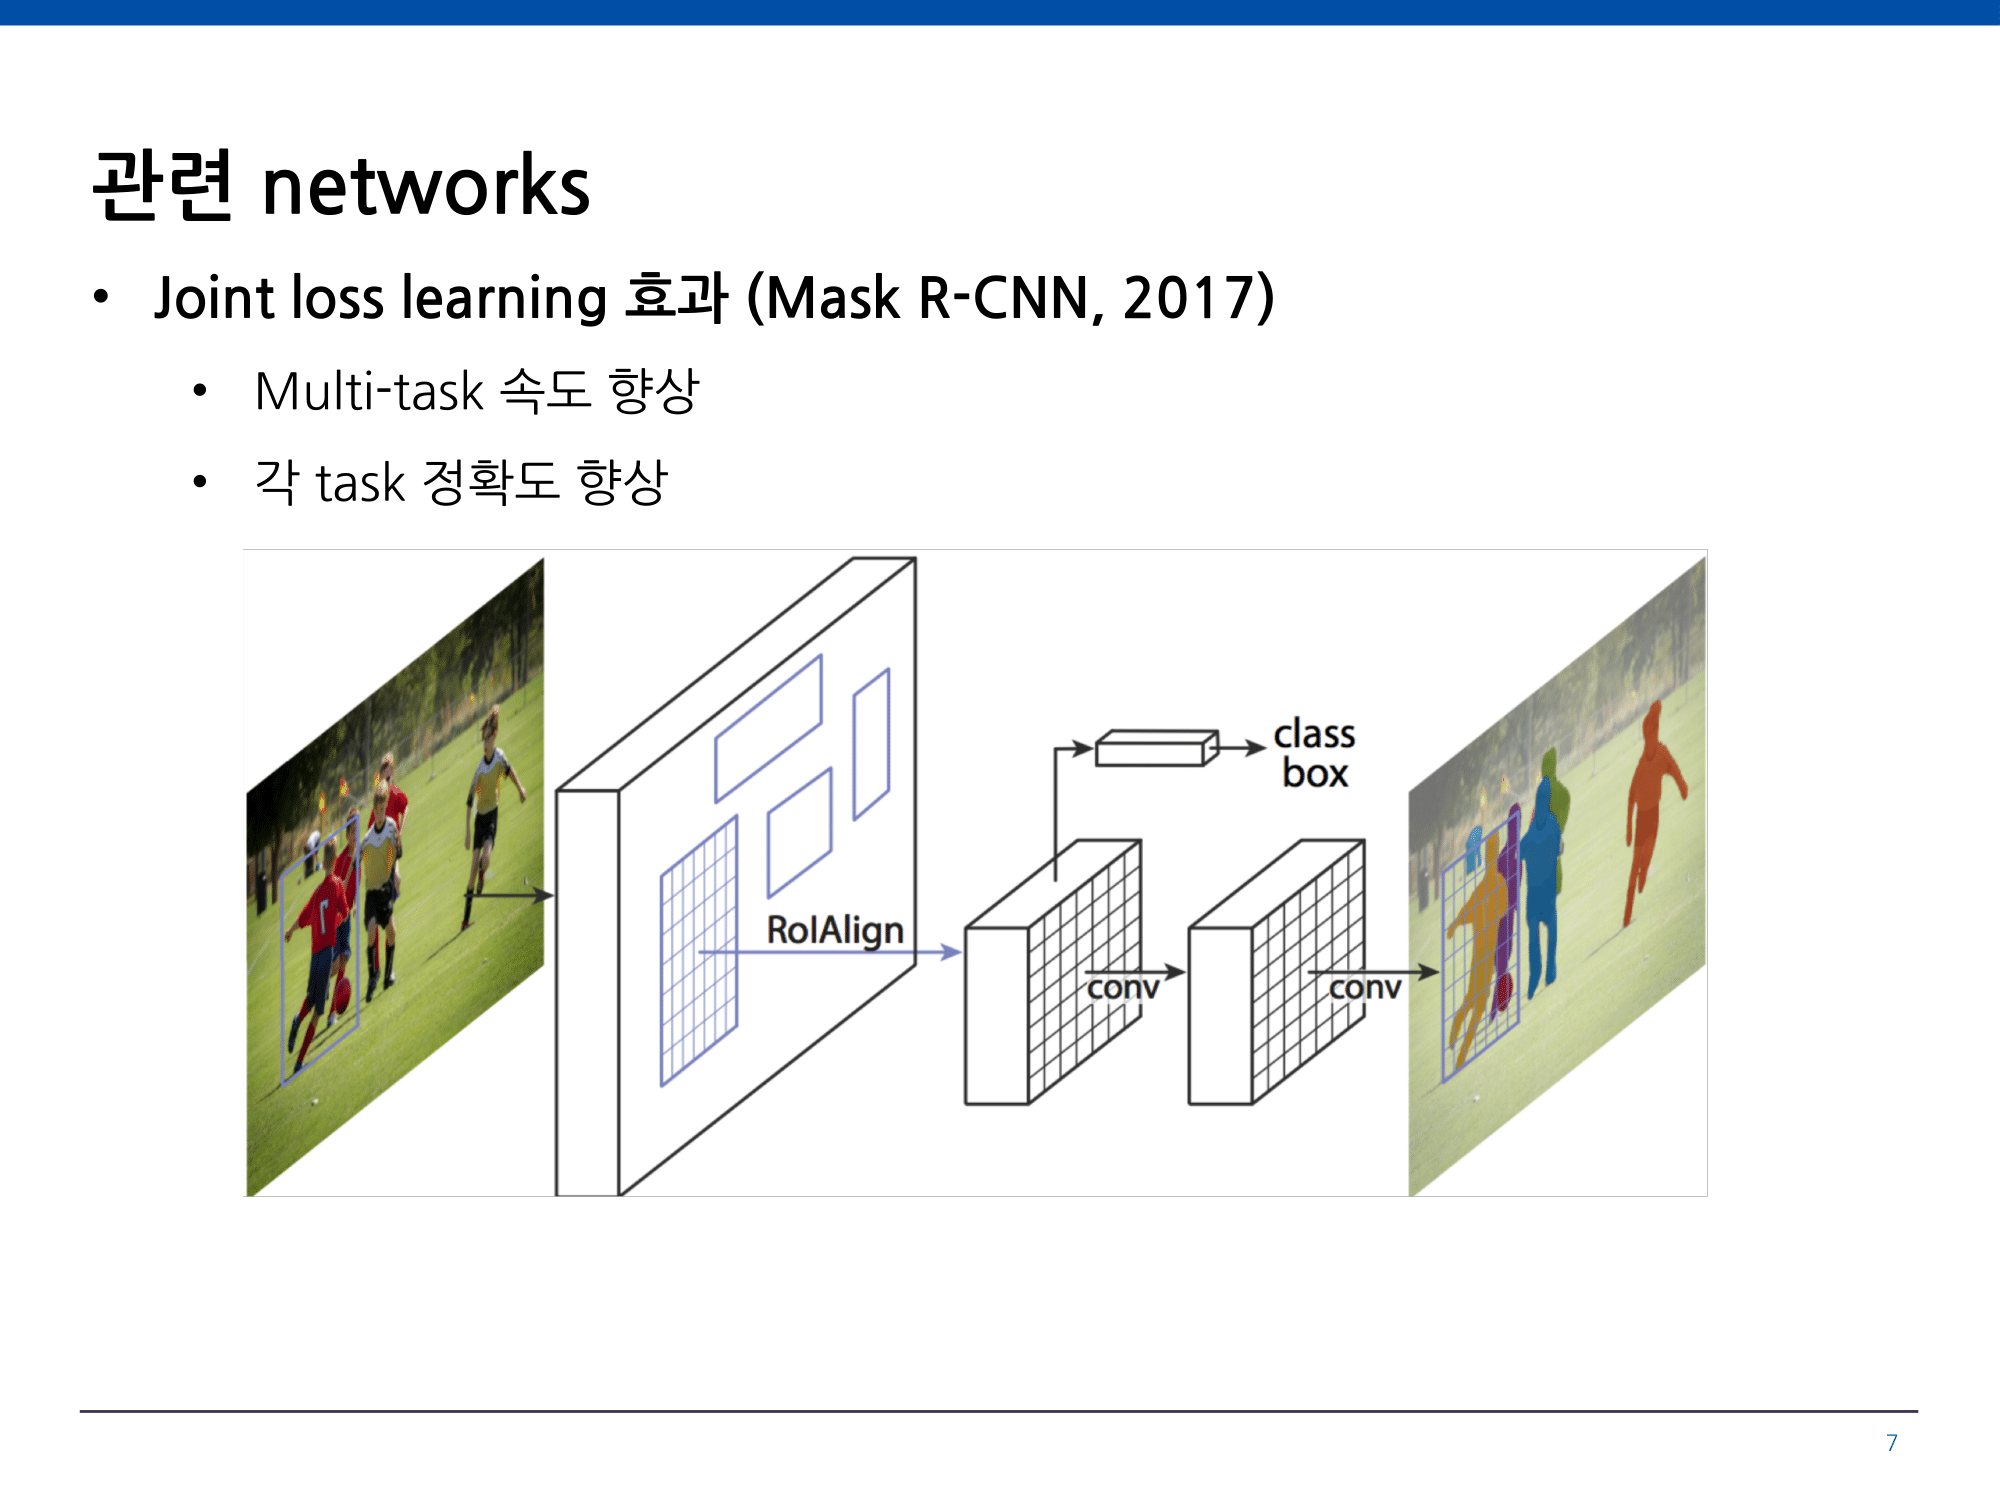
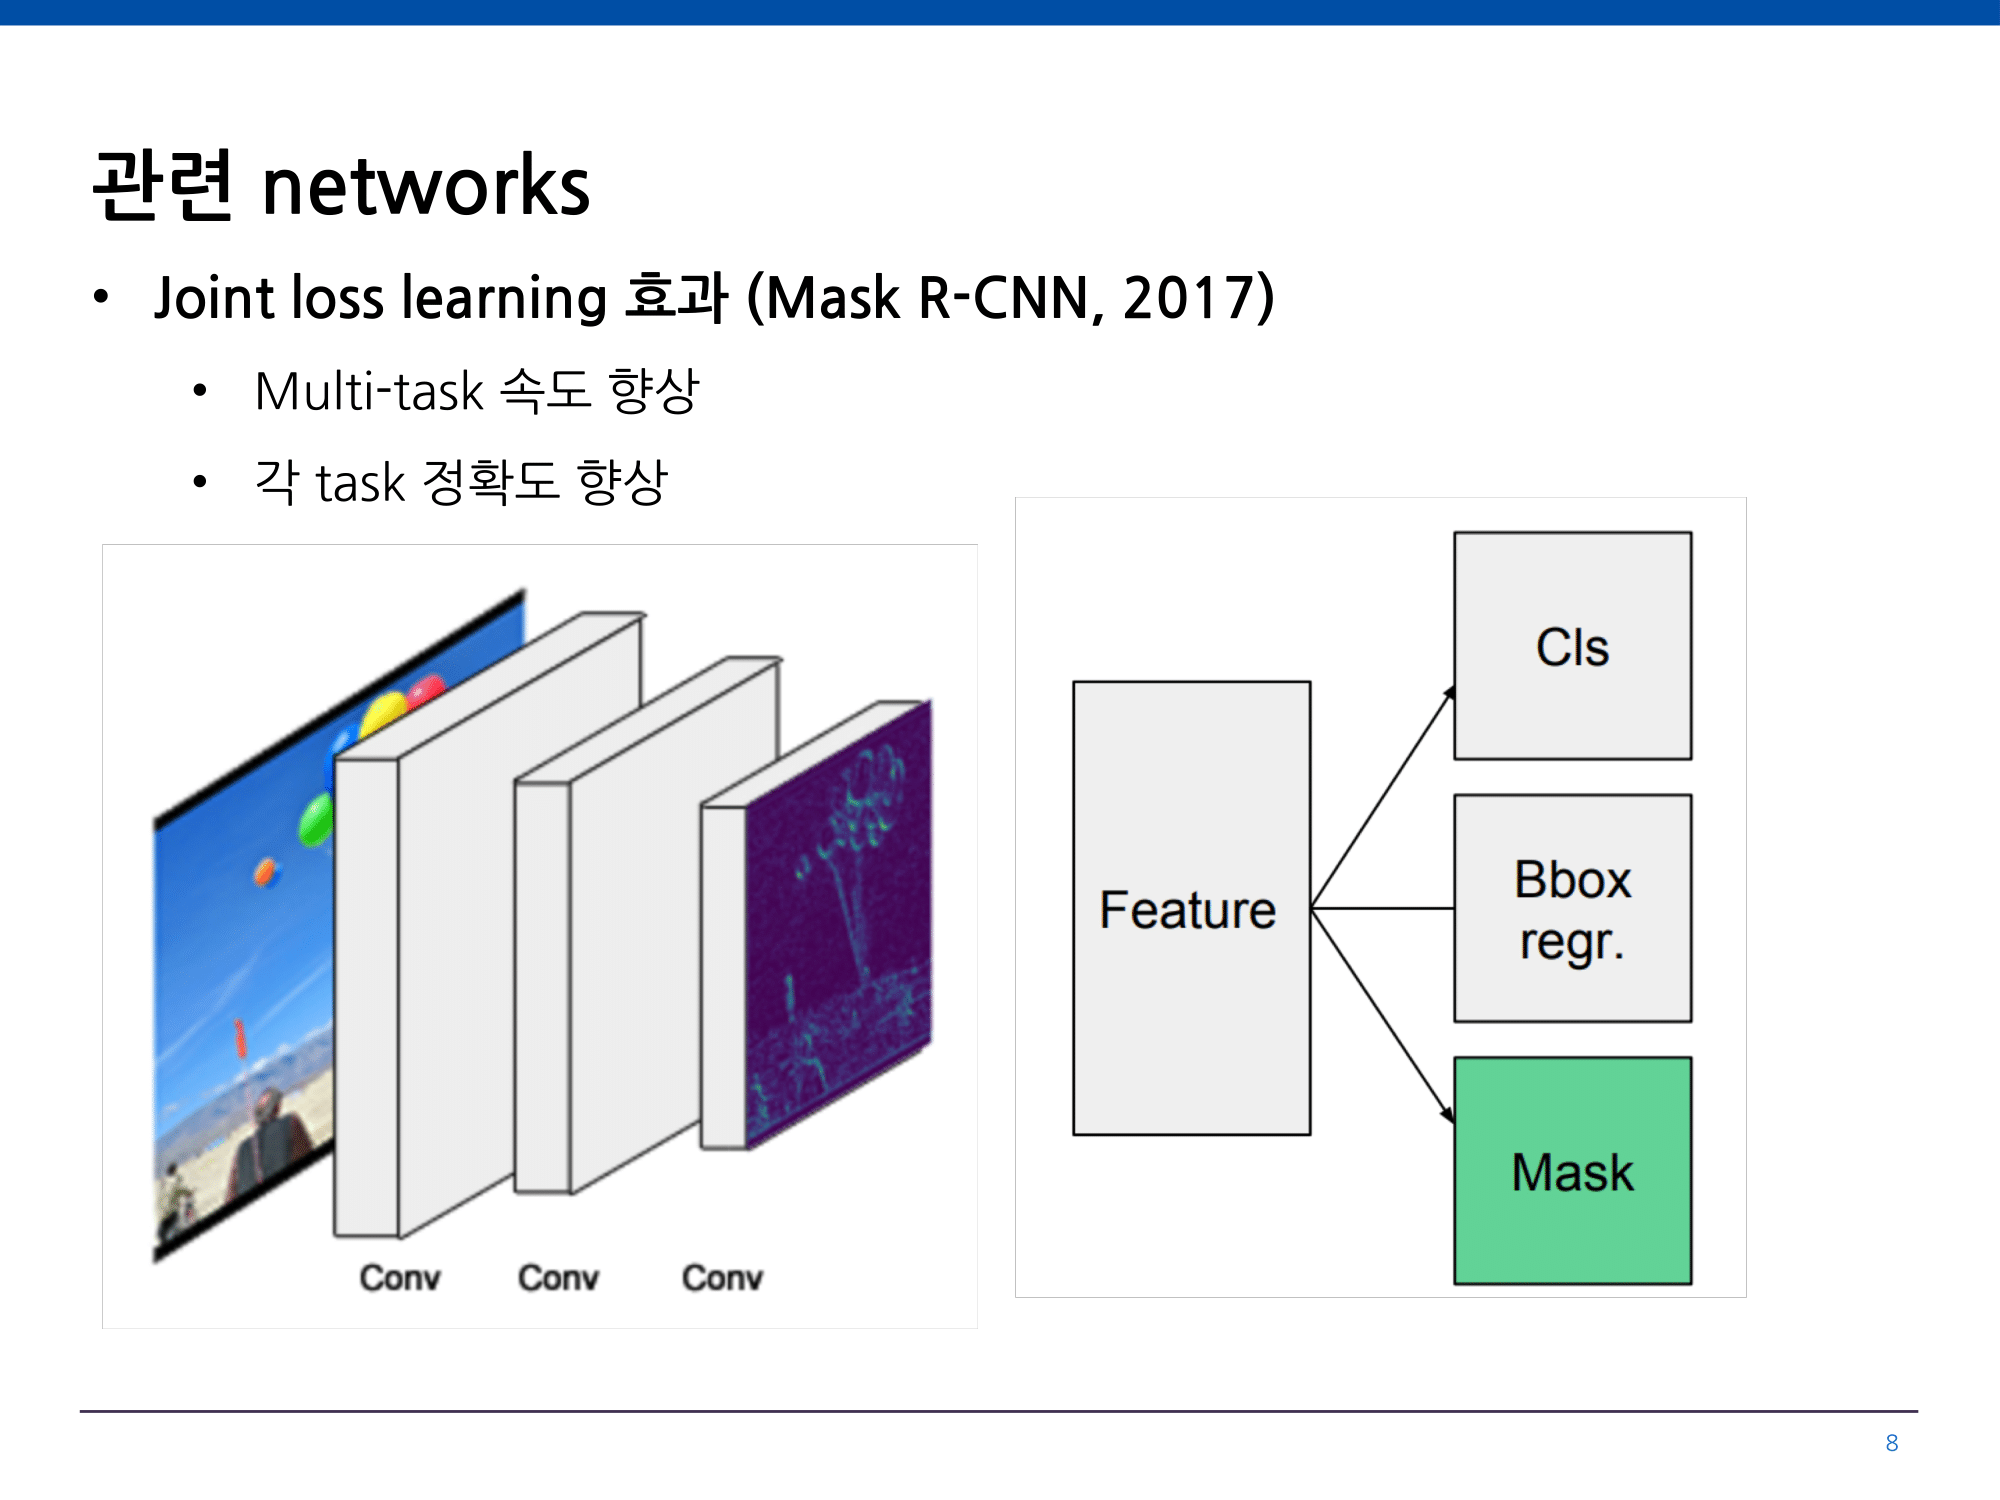
어떻게 표정을 구분하죠?

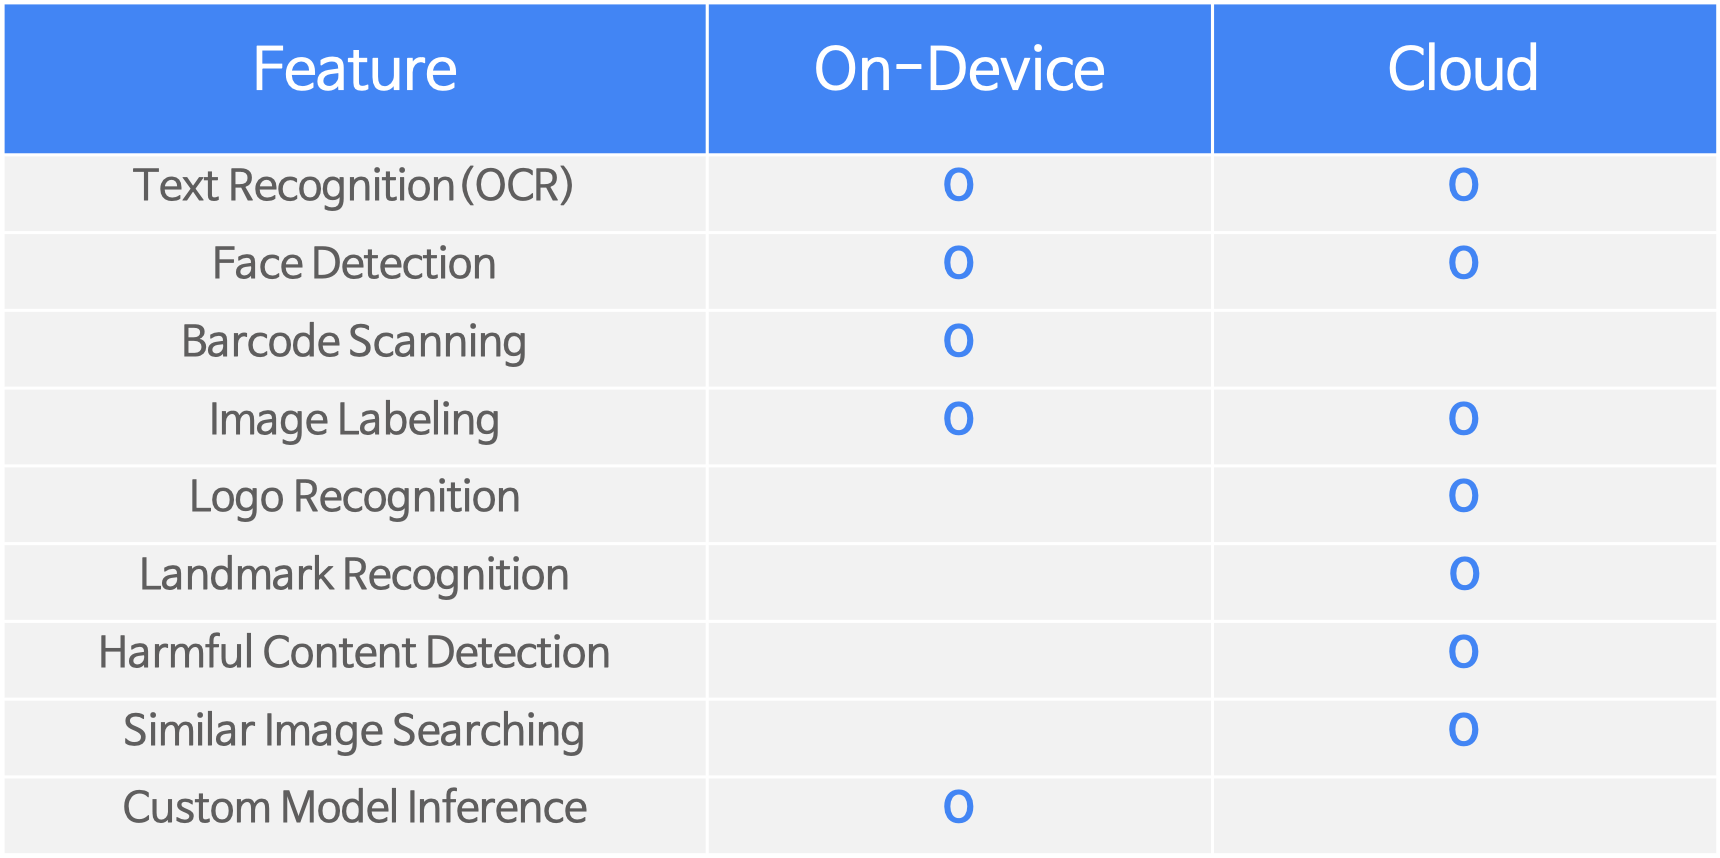
MLKit 지원 범위

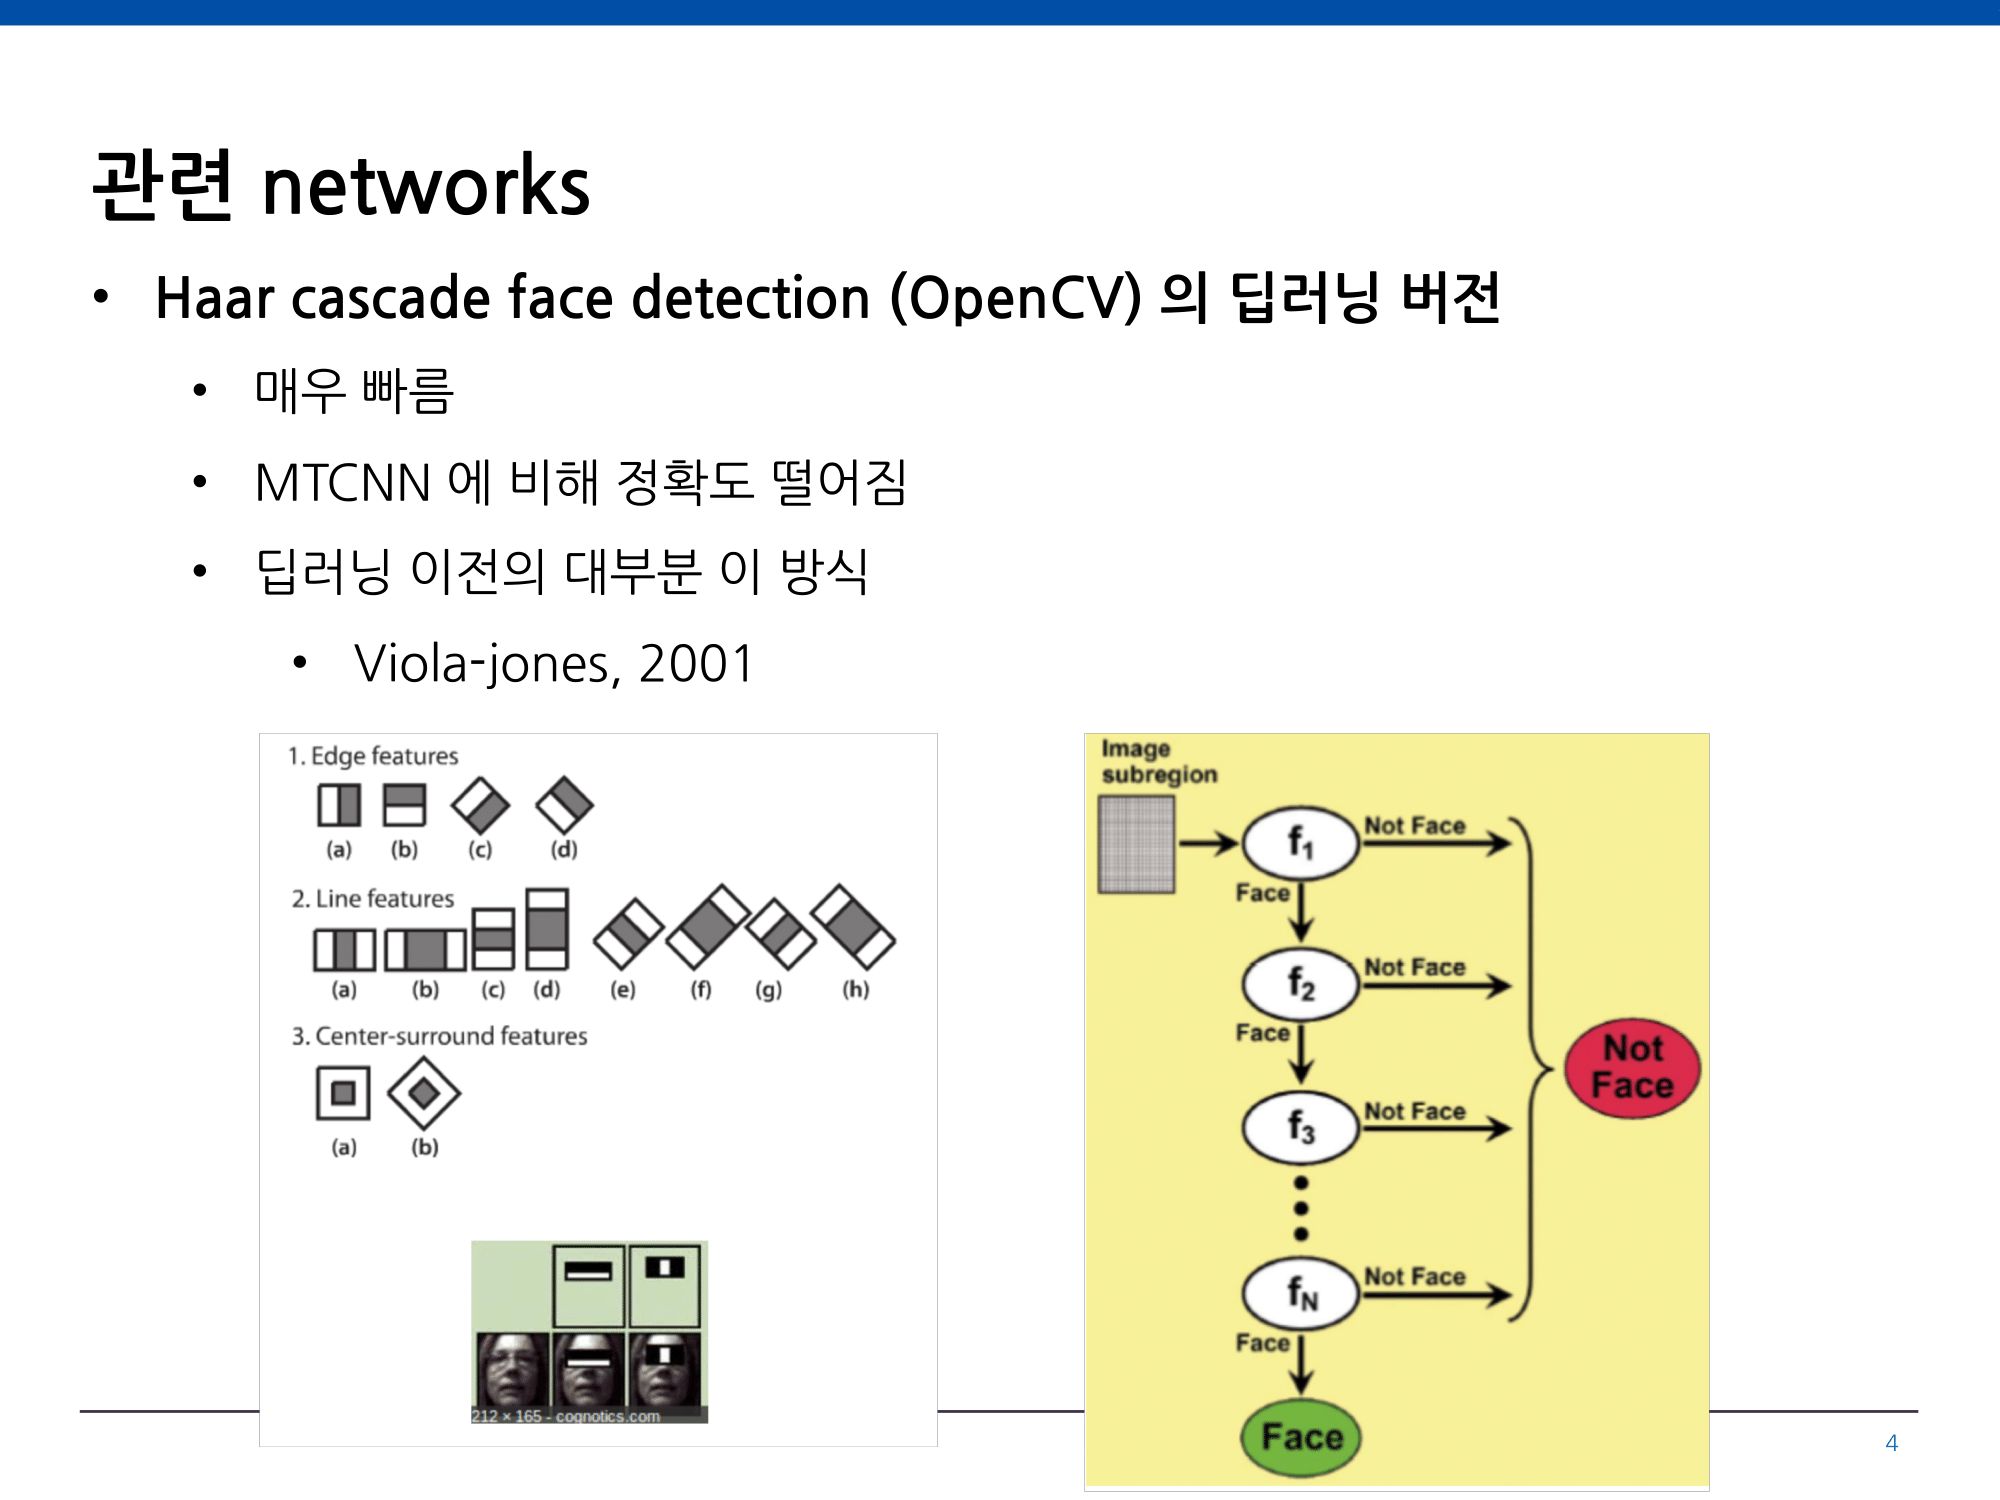
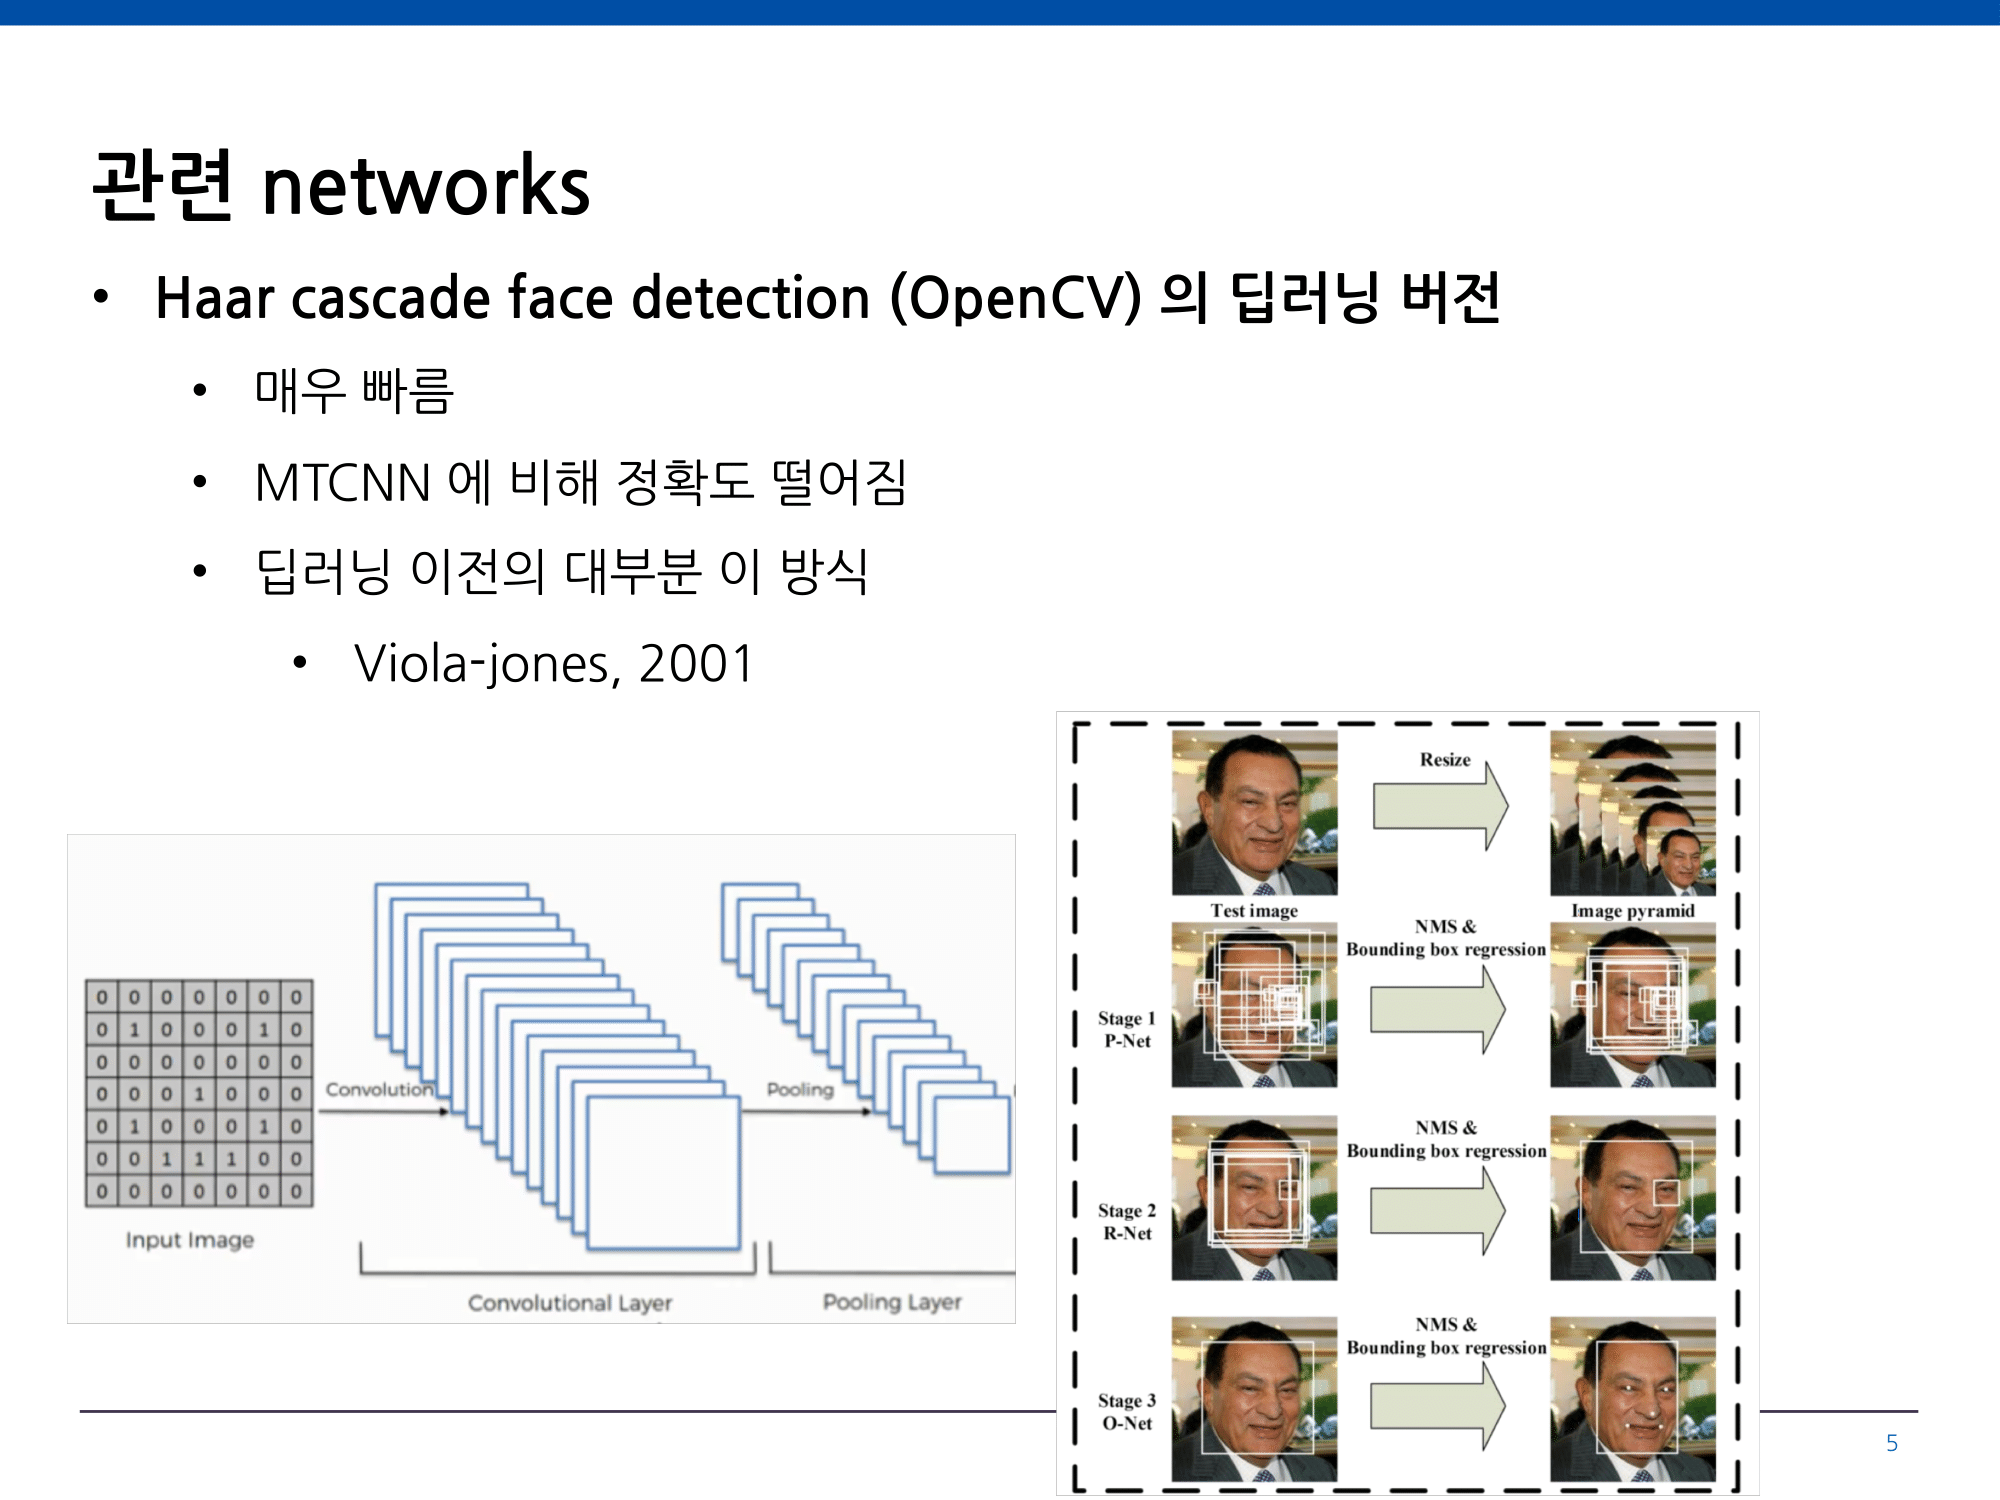
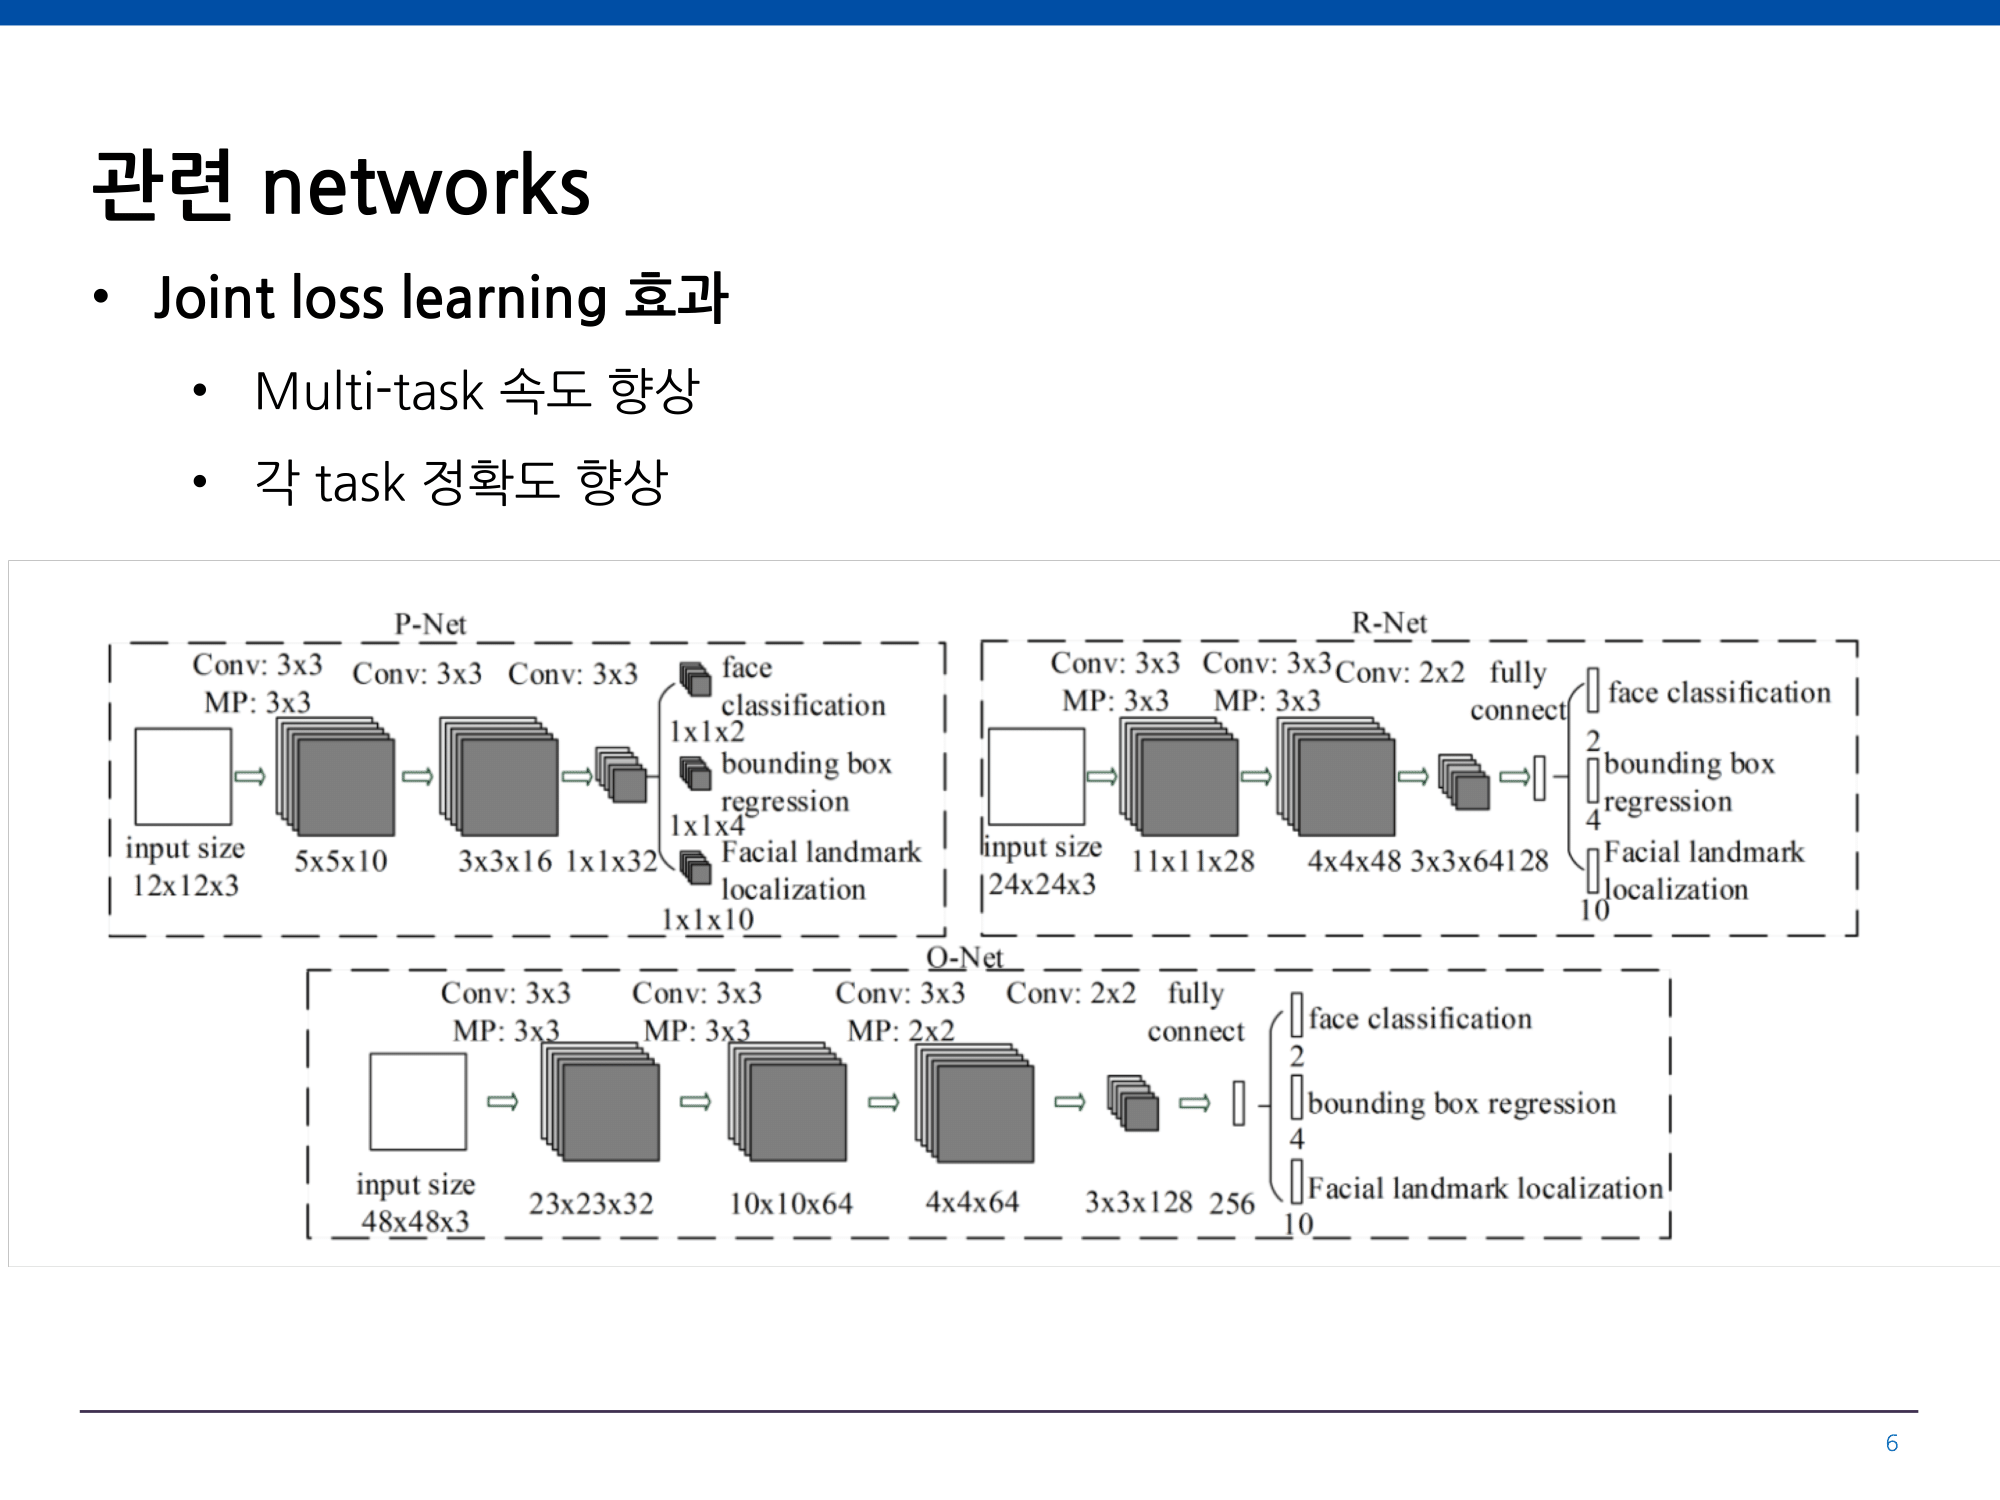
Face Detection 원리
Powered by 이용근 (모두의연구소 MoT)
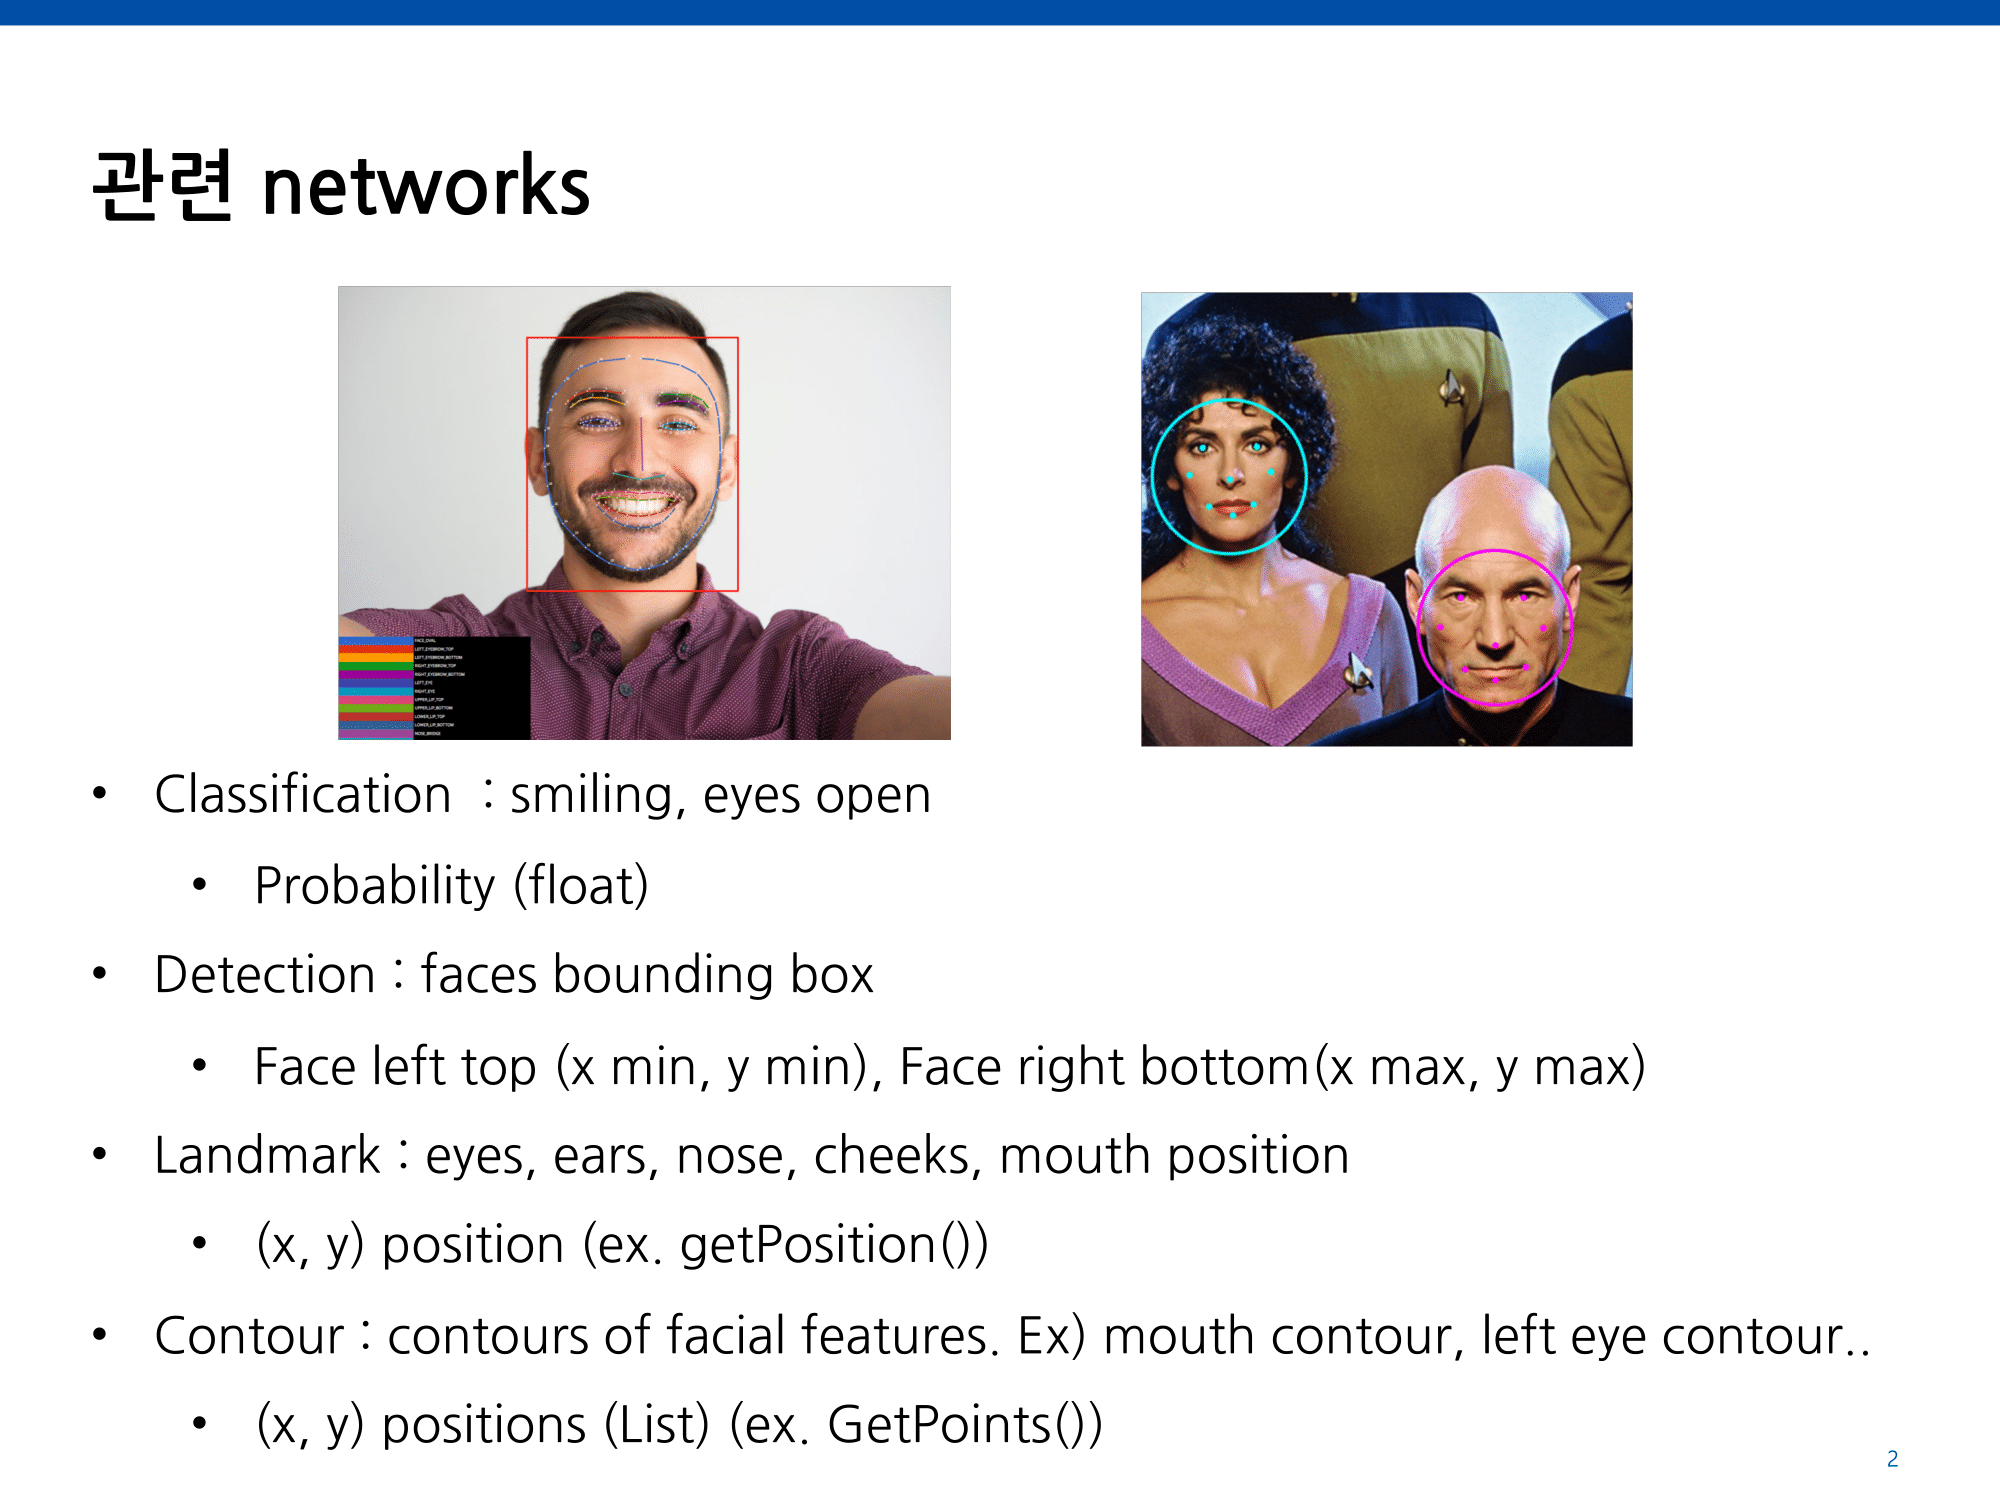

Face Detection을 통해 얻을 수 있는 정보

코의 좌표
Coordinates of the base of the nose입의 오른쪽편 좌표
Coordinates of the right-hand side of the mouth입의 왼쪽편 좌표
Coordinates of the left-hand side of the mouth입의 아래편 좌표
Coordinates of the bottom of the mouth웃고 있을 확률
Probability that the face is smiling오른쪽 눈이 떠져있을 확률
Probability that the right eye is open왼쪽 눈이 떠져있을 확률
Probability that the left eye is open감지된 얼굴의 경계
Bounds of the detected face검출된 얼굴의 회전각
Rotating angle of the detected face검출된 얼굴의 기울기
Tilt angle of the detected face
프로젝트 기본 구성을 가진 저장소를 clone 합니다. Git bash 혹은 Terminal을 열어 아래와 같이 저장소의 feature/settings 브랜치를 clone 해주세요.
git clone https://github.com/Jeongah-Shin/gdg-mlkit-codelabs.git feature/settings
프로젝트를 빌드 해주세요!
아래와 같이 전면 카메라 프리뷰와 함께 앱 아이콘과 이름이 출력되신다면,
세팅 단계를 완료하셨습니다.

지금부터 5분의 시간 동안 기본 세팅 코드를 빌드하는 시간을 가져보겠습니다.
제대로 프로젝트가 빌드되지 않는다면, 사전에 안내드린 가이드를 모두 준수하셨는지 다시 한 번 점검해주세요.
21가지의 ImageFormat 중, 아래의 것들은 알아두면 좋아요!
안드로이드의 주요 이미지 포맷과 YV12
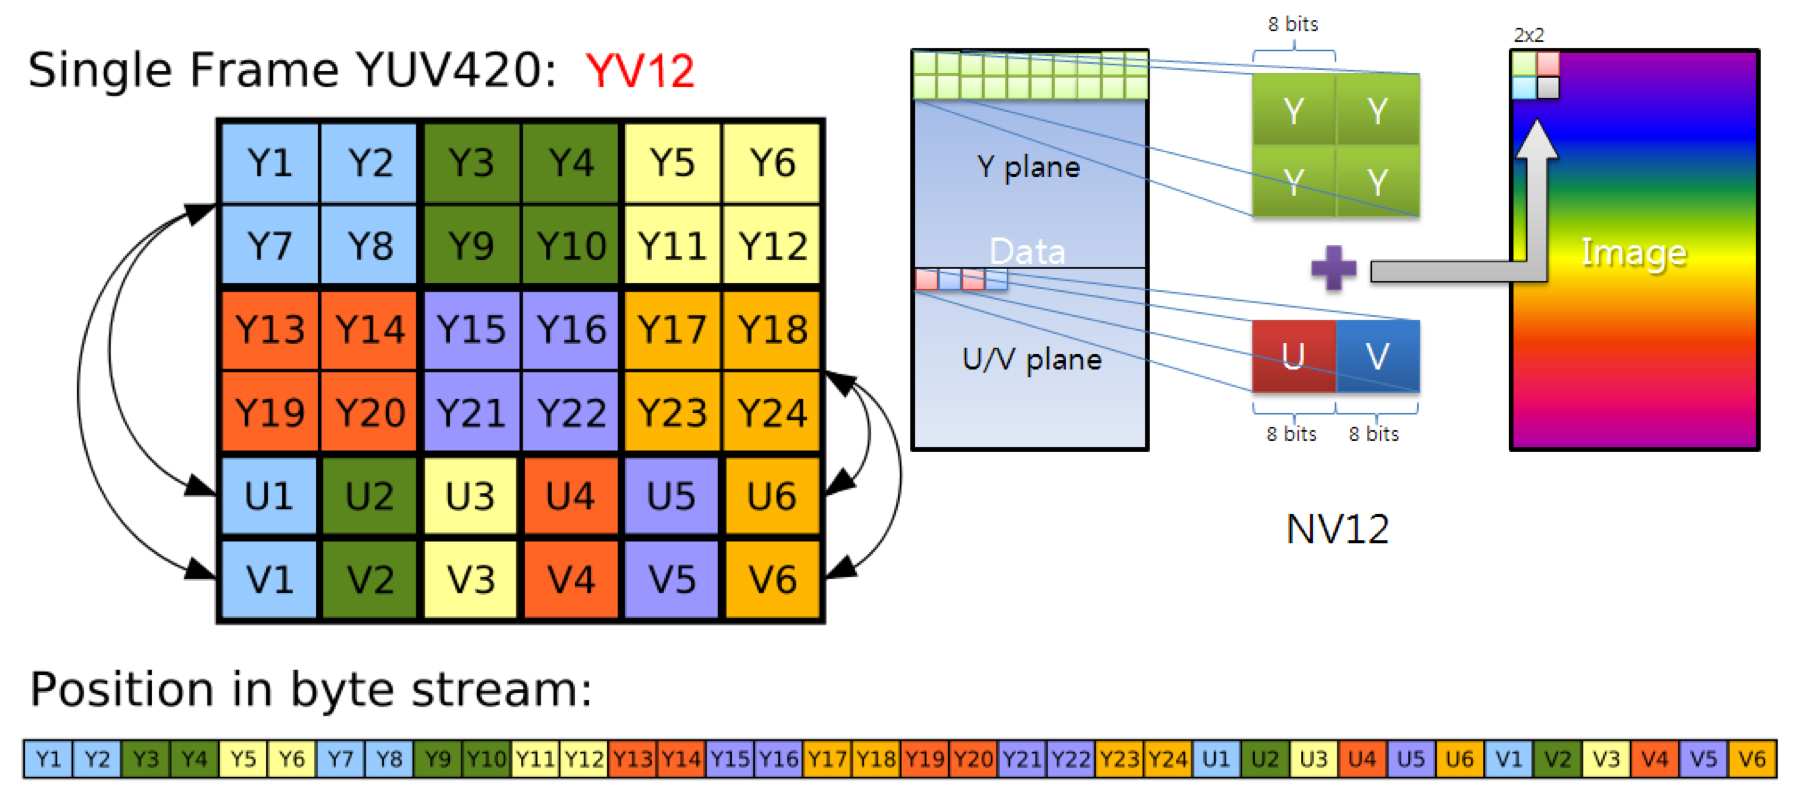
- JPEG
- NV21
- YUV_420_888, YUV_422_888, YUV_444_888
- YV12
ML Kit에서 지원하는 이미지 포맷 종류
PreprocessingExts라는 이름의 Extensions 함수를 담을 파일을 하나 생성해주세요.
    fun encodeYV12(yuv420sp: ByteArray, argb: IntArray, width: Int, height: Int) {
        val frameSize = width * height
        var uIndex = frameSize
        var vIndex = frameSize + (frameSize / 4)
        var yIndex = 0
        var index = 0
        for (j in 0 until height) {
            for (i in 0 until width) {
                val a = (argb[index] and -0x1000000) shr 24 // a is not used obviously
                val R = (argb[index] and 0xff0000) shr 16
                val G = (argb[index] and 0xff00) shr 8
                val B = (argb[index] and 0xff) shr 0
                // well known RGB to YUV algorithm
                val Y = ((66 * R + 129 * G + 25 * B + 128) shr 8) + 16
                val U = ((-38 * R - 74 * G + 112 * B + 128) shr 8) + 128
                val V = ((112 * R - 94 * G - 18 * B + 128) shr 8) + 128
                // YV12 has a plane of Y and two chroma plans (U, V) planes each sampled by a factor of 2
                // meaning for every 4 Y pixels there are 1 V and 1 U. Note the sampling is every other
                // pixel AND every other scanline.
                yuv420sp[yIndex++] = (if ((Y < 0)) 0 else (if ((Y > 255)) 255 else Y)).toByte()
                if (j % 2 == 0 && index % 2 == 0) {
                    yuv420sp[uIndex++] = (if ((V < 0)) 0 else (if ((V > 255)) 255 else V)).toByte()
                    yuv420sp[vIndex++] = (if ((U < 0)) 0 else (if ((U > 255)) 255 else U)).toByte()
                }
                index++
            }
        }

    }
override fun detectFace() 아래에 미리 위에서 선언해놓은 Extensions을 활용해서 RGBA 포맷을 YV12 포맷으로 전환해보도록 하겠습니다.
    private fun getYV12ByteArray(inputWidth: Int, inputHeight: Int, bitmap: Bitmap): ByteArray {
        val start_time = System.currentTimeMillis()
        val argb = IntArray(inputWidth * inputHeight)
        bitmap.getPixels(argb, 0, inputWidth, 0, 0, inputWidth, inputHeight)
        val yuv = ByteArray(inputWidth * inputHeight * 3 / 2)
        encodeYV12(yuv, argb, inputWidth, inputHeight)
        bitmap.recycle()
        val end_time = System.currentTimeMillis()
        Log.d("RGBA to YV12", (end_time - start_time).toString() + " ms")
        return yuv
    }
카메라 프리뷰를 담고 있는 textureView를 통해 현재의 프레임 이미지를 얻어오도록 하겠습니다!
    override fun detectFace() {
        val bitmap = textureView?.getBitmap(textureView!!.width, textureView!!.height)
        if (bitmap != null) {
            byteArray = getYV12ByteArray(textureView!!.width, textureView!!.height, bitmap)
            bitmap.recycle()

        }
    }
FirebaseVisionImage를 위한 metadata를 선언해줍니다.
    private val metadata: FirebaseVisionImageMetadata by lazy {
        FirebaseVisionImageMetadata.Builder()
            .setWidth(textureView!!.width) // 480x360 is typically sufficient for
            .setHeight(textureView!!.height) // image recognition
            .setFormat(FirebaseVisionImageMetadata.IMAGE_FORMAT_YV12)
            .setRotation(0)
            .build()

    }
FirebaseVisionFaceDetector를 위한 options를 선언해줍니다.
    private val realTimeOpts: FirebaseVisionFaceDetectorOptions by lazy {
        FirebaseVisionFaceDetectorOptions.Builder()
            .setPerformanceMode(FirebaseVisionFaceDetectorOptions.FAST)
            .setClassificationMode(FirebaseVisionFaceDetectorOptions.ALL_CLASSIFICATIONS)
            .build()
    }
FirebaseVisionImage추론을 위한 detector를 마지막으로 선언해줍니다.
    private val detector: FirebaseVisionFaceDetector by lazy {
        FirebaseVision.getInstance()
            .getVisionFaceDetector(realTimeOpts)
    }
ML Kit 추론이 잘 되었는지 확인해볼까요?
showBoundingBox(faces : List<FirebaseVisionFace>) 함수를 통해 미리 정의 해놓은 Overlay View에 ML Kit 추론 결과 Bounding Box를 그려줄 겁니다.
    private fun showBoundingBox(faces: List<FirebaseVisionFace>) {
        activity?.runOnUiThread {
            drawView?.setImgSize(textureView!!.width, textureView!!.height)
        }
        for (face in faces) {
            val bounds = face.boundingBox
            drawView!!.setDrawPoint(RectF(bounds), 1f)
            showTextview(bounds.toShortString())
        }
        drawView?.invalidate()
    }
ML Kit 추론 결과 addOnSuccessListener() 가 실행되었을 때, 감지되는 얼굴이 존재하면 Bounding Box를 그려주게끔 반복 제어문을 적어줍니다. 이외의 예외처리는 해도 좋고 안해도 좋습니다!
    val image = FirebaseVisionImage.fromByteArray(byteArray!!, metadata)

    detector.detectInImage(image)
        .addOnCompleteListener {
        }
        .addOnSuccessListener { faces ->
            if (faces.isEmpty())
                showTextview("No Face deteced")
            else
                showBoundingBox(faces)
        }
        .addOnCanceledListener {
            showTextview("Task for detecting Face image canceled.")
        }
        .addOnFailureListener(
            object : OnFailureListener {
                override fun onFailure(e: Exception) {
                    showTextview("Task for detecting Face image failed.")
                    Log.e(TAG, e.toString())
                }
            }
        )
LottieAnimationView를 카메라 프레임 위에 Overlay 해주기 위해 AutofitTextureview 하단에 다음과 같이 View를 선언해줍니다. 애니메이션을 위한 .json 파일의 경우, 프로젝트 세팅에서 미리 assets 폴더에 담겨져 있도록 하였습니다.
    <com.airbnb.lottie.LottieAnimationView
            android:id="@+id/ltViewHappy"
            app:lottie_fileName="animation_w450_h450_happy.json"
            android:layout_width="450dp"
            android:layout_height="450dp"
            app:lottie_autoPlay="false"/>
애니메이션 송출시 마다 id 값을 찾지 않도록 미리 View를 선언해둔 후,
private var ltViewHappy: LottieAnimationView? = null
id 값을 매칭시켜줍니다. 또한, 애니메이션의 설정 정보를 initialize 해줍니다.
    override fun onActivityCreated(savedInstanceState: Bundle?) {
        super.onActivityCreated(savedInstanceState)
        ltViewHappy = view.findViewById(R.id.ltViewHappy)
        ltViewHappy?.apply {
            this.visibility = View.INVISIBLE
            this.speed = 5.0f
        }
    }
본격적으로 애니메이션 송출을 위한 알고리즘을 설계합니다.
    private fun showLottieAnimation(faces: List<FirebaseVisionFace>) {
        for (face in faces) {
            val bounds = face.boundingBox
            val boundWidth = (bounds.right - bounds.left)
            if (face.smilingProbability != FirebaseVisionFace.UNCOMPUTED_PROBABILITY) {
                val smileProb = face.smilingProbability
                if (smileProb > 0.7f) {
                    activity?.runOnUiThread {
                        ltViewHappy?.visibility = View.VISIBLE
                        ltViewHappy?.layoutParams?.width = boundWidth
                        ltViewHappy?.layoutParams?.height = boundWidth
                        ltViewHappy?.x = bounds.left.toFloat()
                        ltViewHappy?.y = bounds.top.toFloat() - boundWidth

                        ltViewHappy?.requestLayout()
                    }
                    if (ltViewHappy?.isAnimating != true)
                        ltViewHappy?.playAnimation()
                    showImageview(resources.getDrawable(R.drawable.ic_calm))

                } else {
                    activity?.runOnUiThread {
                        ltViewHappy?.visibility = View.INVISIBLE
                    }
                    if (ltViewHappy!!.isAnimating) {
                        ltViewHappy?.cancelAnimation()
                    }
                    showImageview(resources.getDrawable(R.drawable.ic_sad))
                }
                showTextview("Smiling Probability Estimation : " + (smileProb * 100) + " %")
            }
        }
    }
다음과 같이 한 줄을 추가해주면 Bounding Box를 잘 찾으면서, 애니메이션이 잘 표시되는지 확인해볼 수 있습니다.
    showBoundingBox(faces)
    showLottieAnimation(faces)